Category Archives: Crafted

Week 50 – Inspiration Comes In Many Forms

Posted on

My inspiration in week 50 came in the form of two pretty amazing experiences. The first was the launch of my co-op’s new magazine, appropriately titled GRAZE. The second was a culinary trip to one of the newer Asian supermarkets in town called Pacific Coast. When I put the two amazing experiences together, it resulted in a batch of homemade kimchi, something I’ve never considered making before this.

GRAZE is the inspiration of our fabulous marketing team at Outpost Natural Foods, and the very essence of what my co-op is all about. Subtitled, “around the kitchen table” GRAZE promises to tempt novice and experienced foodies alike with the products, flavors, and recipes of our amazing local artisans. The magazine, only available in our stores, is not supported by any outside advertising so that we could be sure and have the space to talk about the foods and vendors we love. The inspiration I drew upon this week was a recipe we published from local chef Jan Kelly from the restaurant Meritage. We gave Jan a challenge of one ingredient that she needed to design a meal around, and that was kimchi. Jan of course even made the kimchi from scratch, so I figured, why don’t I try?

Making kimchi from scratch meant picking up some traditional flavors to stock up my pantry, which meant a trip to Pacific Coast. Now growing up as a child of the 60’s and 70’s, an Asian-inspired dinner at home usually meant chicken chow mein, often but not always from a can. I’m sure we had an Asian grocery store in town back then, small as it might have been, but my family would have never ventured to see it. I do however remember going to San Francisco for the first time, must have been around 1972, and my parent’s friends took us to Chinatown for dinner. My world of Asian flavors was expanded that night, not only on the streets and in the marketplace, but also at the dinner table. When I first heard about Kimchi a number of years ago what I heard was that it was some kind of pickled concoction of rotting food that was buried in a jar (yes, in the ground) for a year or so until it was ready to… um, eat. But if you search for it online you’ll see that it can be interpreted a number of different ways, everything from pasta sauce to pickles. Everyone has a different take on it and claims theirs is the best. At least that means it can be customized to include whatever your favorite vegetable or flavor. There were at least three very different looking varieties of kimchi offered fresh at Pacific Coast.

My first impression of Pacific Coast was that I had just stepped into the Mecca of Asian convenience foods. During the past 50 weeks of inconvenience I really haven’t been spending much time at all in the center aisles of any store, so it shouldn’t have been much of a surprise to me that foreign convenience foods would be so enticing. Freezer upon freezer was filled with noodles, pot stickers, buns, shumai dumplings, purple yams, mochi ice cream, and an inordinate amount of fish balls. Lisa began filling her shopping basket almost immediately in what appeared to be a convenience inspired food frenzy. Meanwhile I was having fun looking at all of the graphics and marketing ploys used to sell products to people of differentcultures, knowing how easily it is to buy into the kitsch of it all. Yes, we came home with the giant tin of cream crackers (perfectly toasted and flaky like a pie crust), rice crackers, udon noodles, as well as the ingredients needed for my kimchi. Heck, I could easily be eating those convenience foods in just two short weeks from now, if there is any left that is.

So I started the kimchi that afternoon, before leaving town for a week on business. That meant Lisa would finish making the kimchi as the first step was to let the cabbage tossed with salt and sugar, sit overnight in the refrigerator. She said that she modified the recipe somewhat, using two carrots and grating them instead of julienne, and using a little less chili powder not knowing how potent it was going to be. The size of the cabbage will definitely determine the yield, our batch made about a quart.

I’m really looking forward to getting home from this business trip I’m on, so I can try it on a grilled pork or chicken taco, or with fish as chef Jan had prepared. Do share your kimchi experiences with me, I’d really love to learn more about it.


Refrigerator Kimchi (from Jan Kelly, chef and owner of Meritage Restaurant)

1 head Napa cabbage

2 tablespoons Kosher salt

½ cup sugar plus two tablespoons

3 tablespoons chopped garlic

3 to 4 tablespoons chopped ginger

¼ cup soy sauce

¼ cup fish sauce

½ cup Asian chili powder

2 teaspoons salted shrimp (in a jar)

½ cup julienned carrots (optional)

½ cup sliced green onions (optional)

Water if needed

  1. Cut the cabbage in half then cut crosswise into one-inch pieces.
  2. Toss cabbage with salt and two tablespoons sugar and let it sit overnight in the refrigerator.
  3. Make the bring: combine the garlic, ginger, Asian chili powder, fish sauce, soy sauce, shrimp, and ½ cup sugar. The consistency will be like creamy dressing. If it’s too thick, add a little water.
  4. Add the carrots and green onions to the brine if using.
  5. Drain any water off the cabbage and add it to the brine. Make sure and coat it really well.
  6. Cover and/or store in jars in your refrigerator. Let it sit for at least 24 hours before using. The longer it sits, the stronger the flavor, so keep trying it until you find the flavor that you like.

We used less hot pepper and it was still plenty zesty. We also cut back on the soy sauce and fish sauce because both are quite salty. That’s the beauty of kimchi, it’s infinitely customizable to your taste!


Week 46 – An Einstein I’m Not!

Posted on

What does a middle-aged German girl like me know about bagels? Well I know they were a childhood favorite of mine growing up in the 1960’s in a community with one of the first bagel shops in the area. Bagels and lox were a treat in our house and I learned to appreciate both the appropriate texture and flavor at a very young age. We didn’t have the Brugger’s or Einstein’s shops known today – no these shops were small local bakeries that perhaps learned the craft of bagel baking in New York or Chicago – and opened up in my neighborhood I’m guessing on the demand from the Jewish community.

What do I know about bagels today? Well first of all I haven’t eaten a bagel in more than 46 weeks. Prior to my voyage into the from scratch food routine, I had avoided bagels for a couple of years because of the calorie content – a whopping 72 calories per ounce – or about 364 calories for an average size bagel. Spread on the cream cheese and we’re talking 1/3 of the calories I might consume in an entire day. But I got a craving for bagels this week and naturally if I wanted them, I would have to make them myself.

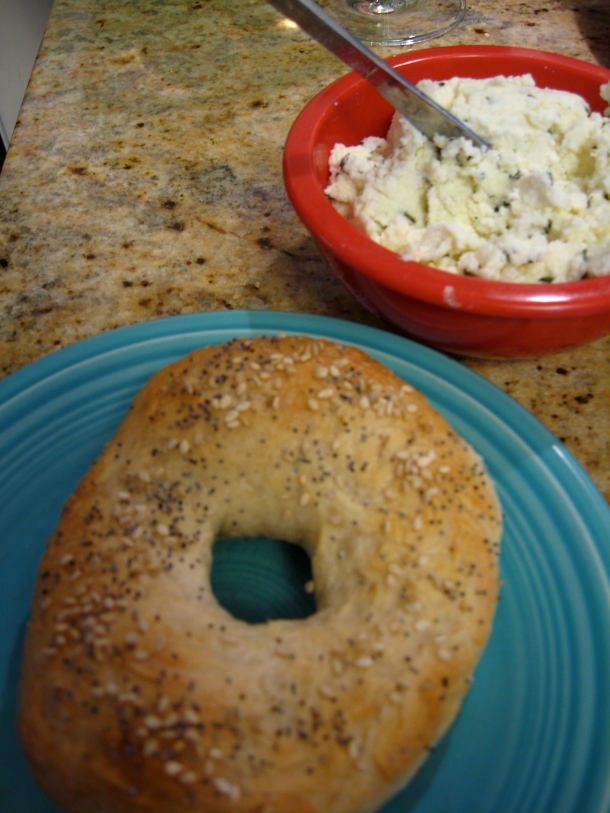
Research led me to the particular recipe I’ve included in this post – not too technical for my abilities – but descriptive of what I remembered about the texture and flavor of a really authentic bagel. A bagel by definition is known as dense, chewy and rather doughy with a nicely browned and crispy crust. That’s the bagel I was in search of!

Naturally I wanted some kind of cheese spread to go along with my bagel. Since I didn’t have the necessary mesophilic starter for cream cheese, and since I was hoping to do something low-fat, I decided to use this recipe that I’ve had my eye on since getting my cheese making book for Christmas. It’s super simple to make, and since you add your own salt and/or herbs, it can take on whatever flavor profile you love. I was happy to see Meyer lemons were in season, as they tend to be a bit sweeter than regular lemons (they are a cross between a lemon and either a mandarin or common orange).

While these two recipes took up a big part of my Sunday time (ie: I prepared no other food for the week), they were really worth the effort. I brought the majority of them into work today at the delight of my co-workers, or at least that’s what they tell me. Enjoy!


Meyer Lemon Cheese

½ gallon milk (I used 2%, you need a little milk fat)

¼ cup lemon juice (I used Meyer Lemons)

½ teaspoon salt

1 tablespoon chopped fresh basil or other herbs


Heat the milk on the stove in a large pot, stirring frequently until it reaches 185-195°. Remove from the head, add the lemon juice to the milk, and stir. Cover the pot immediately and let rest for 15 minutes.

After 15 minutes check you curds and whey. The whey should be clear and not milky. If it’s milky, add a little bit more lemon juice to the pot and wait a few minutes more.

Pour the curds into a colander lined with cheesecloth. I save the whey from both the curds dripping through the cheesecloth as well as from the rest of the cheese-making process. (see week 41)

Tie the corners of the cheesecloth and hang the curds over a bowl to drain for about an hour. Remove the curds from the bag and add the salt and herbs. My cheese was a bit dry, so I just added back some of the whey I had saved to make it creamier.

Store in a covered container in the refrigerator for 1-2 weeks, if it lasts that long.


Bagels (from the book, Artisan Bread in Five Minutes A Day, by Hertzberg and Francois)

For The Dough

3 cups lukewarm water (100°F)

1 ½ tablespoons active dry yeast (2 packages)

1 ½ tablespoons Kosher salt

1 ½ tablespoons sugar

6 ¼ cups bread flour

Extra flour for dusting

Sesame seeds and/or poppy seeds

For The Boiling Pot

8 quarts water

¼ cup sugar

1 teaspoon baking soda

This dough mixes best using a 14-cup capacity food processor with dough attachment, or a heavy-duty stand mixer with a dough hook. Mix the yeast, salt, and sugar with the water in the bowl of your mixer or food processor. Add the flour to form what will become a very sticky dough. If you don’t have a machine to use, keep your hands wet to incorporate all of the flour.

Cover the dough and allow it to rest at room temperature until the dough rises and collapses (or flattens on the top), approximately 2 hours. You can use the dough immediately, but it may work better refrigerated for a few hours. I also read in Mark Bittman’s book, that refrigerating or resting the dough for several hours will also contribute to a more developed flavor.

Twenty minutes before baking time, preheat your oven to 450°F, with a baking stone (preferably) in the middle rack and an empty broiler tray or cast iron pan below. You will use the second pan to create steam. If you don’t have a baking stone, a lightly oiled baking sheet should work.

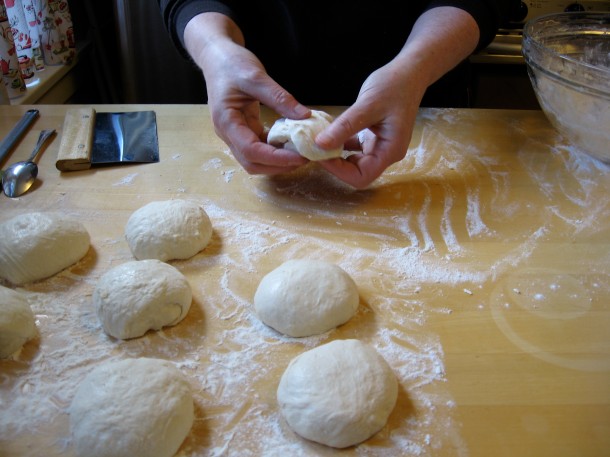
Generously dust the surface of the refrigerated dough with flour and cut off a 3-ounce piece of dough about the size of a small peach. Dust the piece with more flour (on your counter top as well) and shape it into a ball by stretching the surface of the dough around the bottom on all four sides, rotating the ball a quarter turn as you go. (Tuck and spin, tuck and spin. You’re creating elasticity in the dough.) Set the dough ball on a floured surface and keep working the rest of the dough. Cover the balls loosely with a towel that has been lightly floured (you’ll use this towel again in a bit). Let the balls rest for 20 minutes.

Start you water boiling (don’t forget to add the sugar and baking soda once it begins to boil).

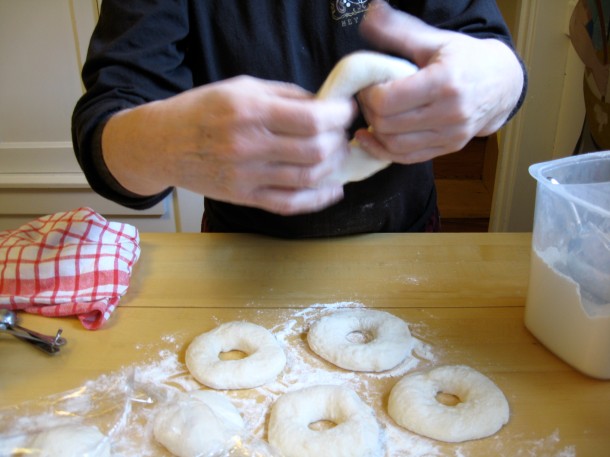
Next, punch your thumb through the dough ball to form the hole. Hold the dough in your hands and ease the hole open with your fingers as you rotate the dough in a circle. Your dough should look like a fat bicycle tire. The hole will get smaller as the dough rests, so don’t worry that it’s too big.

Drop the bagels into the simmering water one at a time, making sure they are not crowding one another (3-4 at a time). Let them simmer for 2 minutes, then turn them over to cook for one more minute. (I was so busy dropping bagels into the water and shaping the others that I forgot to take pictures. Whoops!)

Remove them from the water with a slotted spoon and place them on a clean kitchen towel (the one you used to cover them) that is lightly floured. This will help absorb some of the excess water and keep them from sticking.

Place the bagels on a well-floured peel if you’re using a baking stone, or on a lightly greased baking sheet if you’re not using the stone. Sprinkle with poppy seeds and/or sesame seeds. Yes they looked funny, I was worried.

Slide the bagels directly onto the hot stone or baking sheet onto the middle oven rack. Throw 2 ice cubes into the broiler pan or cast iron pan and quickly close the door to keep the steam inside. Bake for about 20 minutes until brown and firm. Repeat process with the rest of the batches.

Oh and if you find my description or process to not be helpful, take a look at a post by the authors of the recipe.


Week 44 – T-minus 8 Weeks And Counting

My year of inconvenience is slowly but steadily coming to an end. I mention slowly because this past week was particularly slow going. Work was packed with more meetings than usual, and my free time was spent either shoveling snow or working on a painting/remodel project at home. So meals this week were rather haphazard at best. Fortunately I had my reserve of frozen meals to get us through most of the week. Here’s a sample of what I’m talking about.

Lisa – “What’s for dinner?

Me – “I dunno, how about this container marked ‘chicken verde’ does that sound good?”

Lisa – “Sure I’d love to have Mexican food tonight.”

Me – “uhm… this looks like chicken in here but I don’t see any ‘verde’ to speak of. I think it is Indian flavored chicken something that we made awhile ago.”

Lisa – “I don’t care as long as I don’t have to cook it.”

And so it went. We didn’t starve nor did we eat particularly well. I’d say I actually had two high points in the week, which to me are kind of like the yin and yang of food cravings.

The Yin: Sitting in meetings all week in our office conference room, I happened to chose the side of the table directly across from a group of photos we had up to assist with ideas for a store remodel. One picture in particular, demonstrating “unique and abundant” was a display case of large, beautifully crafted pretzels from my trip to Switzerland in 2009. Wow, did I crave pretzels all week long! So, high point number one which met my salty food craving, was to visit the Old German Beer Hall after work on Friday with friends…where they have delicious Hofbrau beer AND delicious GIANT soft pretzels. While I know I can make these myself and in fact making pretzels is great fun, I admit it was even more fun to have someone else make it for me.

The Yang: This can best be described as an unreasonable but growing desire for cinnamon rolls. For those who know me know that I really don’t eat cinnamon rolls as I generally prefer the salty to the sweet. But I just couldn’t shake this craving no matter how hard I tried. And for the sake of trying something new each week for the rest of my year, I’ve never before tried making cinnamon rolls. The problem I have with the idea of making them from scratch is the time vs. eating factor. Using yeast (as one should) it takes at least 3 hours from start to finish, which means if I want one fresh in the morning with my coffee I’m getting up at 5am on a weekend. Forget that! Then I stumbled across this recipe that PROMISED to be just as good as the yeast version without the yeast and without the wait. I’m sorry I don’t remember where the recipe is from but trust me, it satisfied the craving particularly well.

No Yeast, No Kidding Cinnamon Rolls

For the dough:

2 ¾ cup white flour (plus extra for dusting the counter)

2 tablespoons granulated sugar

1 ¼ teaspoon baking power

½ teaspoon baking soda

¾ teaspoon salt

1 ¼ cup buttermilk

6 tablespoons melted butter


For the filling:

2 tablespoons melted butter

2 tablespoons granulated sugar

1 tablespoon cinnamon


For the glaze:

2 tablespoons water

¾ to 1 cup powdered sugar


Preheat the oven to 425°F. Don’t wait like I did, because this recipe comes together very quickly.

Mix together the dry ingredients of the filling (the sugar and cinnamon) in a small bowl so you have it ready when you need it.

In a large mixing bowl, stir together the dry ingredients for the dough (the flour, sugar, baking powder, baking soda, and salt). Add the butter and buttermilk and mix gently. At this point the dough will come together very sticky, but don’t worry. Spoon it on top of a heavily floured counter and sprinkle a bit more flour on top so you can mix it.

Flour your hands as well and gently knead the dough, adding more flour if necessary, kneading until the dough is both manageable and fairly smooth.

With a rolling pin, roll out the dough into a rectangle approximately ½ inch thick. The rectangle I rolled was about 14 inches in length.

Spread the melted butter over the dough and sprinkle with the cinnamon and sugar mixture. There may seem like a lot but use it all.

Roll the dough lengthwise, somewhat tightly, and cut the dough into rolls that are about 2 inches thick.

Place the rolls into a lightly greased pan (I used an 8”x8” pan). I started with one roll in the center and built the others around it. They will puff up when they bake and fill in the empty space in the pan.

Bake for about 20-25 minutes, or until the edges have turned a golden brown.

While the buns are baking, mix together your glaze and pour onto the rolls while they are still warm.

Yum – yes yum. While these are a bit more like biscuits than true cinnamon rolls, I was not at all disappointed and hope you aren’t either.


Week 43 – Time For Sushi

It’s Valentines Day and while many people will have their hearts set on chocolate or cake or other sweet delectable’s of the day, I say there’s no better way to celebrate with your sweetie than with sushi.

Sushi is something I had given up for the year (the sushi made at my co-op), although I have been invited out to celebrate special occasions with friends where local sushi was the destination. Sushi also has a special place in my heart for Valentine’s Day. I met my sweetie for the first time about 16 years ago while I was sampling homemade sushi at one of our stores and she was sampling apple cider as one of our sales reps. It’s unfortunate I don’t have a strong recollection of the day or event – but that doesn’t mean a lasting impression wasn’t made – or that it was the beginning of the best of the rest of the years of my life!

To many people sushi means “raw fish” and if that were the case I would avoid it like the plague. My very first sushi experience was in 1983 when I went to a natural products trade show and was introduced to the great folks at Eden Foods. I was invited to a party they were sponsoring after hours at the show, and it was there I learned how to roll my first sushi roll. (Yes, it was sushi I was rolling.) It was filled with fresh vegetables, daikon radish, umeboshi plum paste – all flavors I had never had before that day. I instantly became a sushi convert.

So this year I made sushi for Valentine’s Day. And Lisa found another vintage garlic keeper on Ebay to replace last week’s unfortunate mishap. Life is really great!

Sushi Made Easy (really, it is easy)

1 package Sushi Nori

2 cups sushi rice or short-grain brown rice

¼ cup brown rice vinegar

Filling:

Fresh vegetables like avocado, cucumber, carrots, watercress, or lightly steamed asparagus

Cream cheese, smoked salmon, steamed shrimp

Accompaniments:

Wasabi (a spicy hot green Japanese mustard)

Soy Sauce

Pickled Ginger


Cook the rice, 1 cup of rice to 2 cups water. If cooking brown rice it will take twice the amount of time as white sushi rice. Sushi rice cooks in about 25 minutes. Brown rice will take about 40 minutes.

Allow the rice to sit covered for 10 minutes after it is cooked. Remove the cover and empty into a large bowl to cool down. After it has cooled a bit (15-20 minutes), add the brown rice vinegar and stir, careful to not over-mix and make the rice too sticky.


Prepare your vegetable or fish fillings. I cut veggies into thin matchstick size pieces. If using shrimp or smoked salmon, make sure those pieces are also long and thin, rather than diced. They will stay together in the roll much better.

Lay a sheet of sushi nori on top of a dishtowel that is folded in half. Line up the end of the nori with the end of the dishtowel closest to you. You will use the towel as a rolling mat.

Crumble 1 cup of cooked rice over the top of the nori, leaving about two inches at the top of the sheet uncovered by rice.


Moisten your fingers with water (I keep a small bowl next to me) and press down on the rice until it holds together (it will be very sticky). Make a groove in the rice near the center and arrange your veggies and fish across the rice inside the groove.


Moisten the 2-inch edge of the nori with water so it becomes subtle. This will help seal the roll at the end of your rolling.


Using the edge of your dishtowel as your guide, begin rolling the nori roll away from you, pressing firmly like rolling up a jellyroll. Keep rolling using the towel as a guide around the roll until it gets going, then lay the end of the towel down and finish the roll by sealing the nori to itself.


When I have all the rolls rolled up, I like to wrap the roll in plastic and refrigerate for a bit to firm it up. After it has chilled, slice the rolls carefully into eight or more pieces. Serve with the accompaniments.

Week 40 – It’s in the Dairy Air

The Green Bay Packers just beat the Chicago Bears and are heading for the Super-duper Bowl. It’s getting pretty exciting here in Wisconsin. Oh yea, and I made some cheese and yogurt. Talk about excitement!

I have to say I’ve been way excited all week, long before this football craze came along. I’ve been hoping to try my hand at a few other types of cheese besides the mozzarella I made a week or so ago, perhaps something quicker and easier to build up my confidence a bit. And yogurt – well I really never considered making it at home since it’s a product well within the limits of my rules – however everyone was saying it’s just so darn easy and economical – so I had to try my hand at it.

When I was in college back in… well it doesn’t matter what year it was… when I was in college I had a yogurt maker. Making yogurt was one of my first ventures into natural foods and hey, everyone was doing it. All I knew of making yogurt were the instructions that came with the yogurt maker. Heat some milk, add some plain yogurt as the culture, pour into the small glass jars and snap on the lids, then turn on the machine. There it sat quietly on the counter of my apartment, doing its yogurt magic overnight while I slept snugly in the next room. The following morning I would find something in those jars that was perhaps slightly runny, but pretty much looked and tasted like yogurt.

Fast forward to this past week. I no longer have that yogurt maker of my college days, and while a friend offered to lend one to me I had already been reading enough online about making yogurt in a Crockpot, and decided that would be my yogurt maker of choice. Okay I’m really trying to curb my enthusiasm here. Making yogurt in a Crockpot is totally awesome! In fact I’m trying my best to eat what I made quickly enough so I can make another batch this week. What’s so great about this method is that I know a lot more about food than I did when I was 20, and understanding what it takes to get the consistency I wanted takes nothing more than a bowl, a colander and some cheesecloth. I now have yogurt, Greek yogurt, and something that resembles sour cream in my refrigerator – all from one batch of Crockpot yogurt.

Before I get to the yogurt recipe I also made some cheese this week in preparation for a photo shoot and video that’s happening this coming Tuesday. Oh, I didn’t mention that earlier? Yea, it’s funny what happens when your communications director at work sends out a press release on your blog project. Seems like I got myself involved in an upcoming story and online video for our local paper, as well as a spot on a morning show this coming Friday. I’m excited and a bit nervous. And yeah, I’ve been cooking and cleaning all weekend in preparation. So the cheese recipe, “queso blanco”, will complete the meal I’m making, which is my pork carnitas on homemade corn tortillas, topped off with some homemade queso blanco and homemade yogurt “sour cream.”

Okay, here are the really easy steps to making Crockpot yogurt. My Crockpot, which I’m guessing is about 20 years old, didn’t quite get the milk to temp in the time the recipe said it would, so I think I have a shortcut for the next time I make it that I’ll include in the steps to follow. I honestly don’t believe you really need a Crockpot, and I’m going to try it without the next time I make it.

What you’ll need to make the yogurt is:

½ gallon of milk

2 packets of yogurt starter, or 2 tablespoons plain yogurt

1 Crockpot or slow cooker of your choice

1 kitchen thermometer (this is science baby, make sure you have one and use it)

1 large and warm bath towel (yes, for making yogurt)

So first, you need to get your milk up to temperature. All signs point to using milk that isn’t ultra pasteurized, just like in making cheese. I used skim milk and it didn’t affect the texture or taste of the yogurt, at least not to the point I expected it would.

The recipe I used said to set your Crockpot on low for 2 ½ hours to get the milk between 180 – 190° mainly for the purpose of creating a sterile environment for inoculating the milk with yogurt culture. My 20-year old Crockpot took 4 hours, so next time I’m just going to bring it to temp in a pot on the stove.

Next, once it reaches 180° you need to let the milk cool down to 110° which is the magic temperature for inoculating the milk. It took about 2 hours for the milk to cool down to that temperature so don’t wander off too far, you’ll want to keep checking.

Once the milk is at 110° you’ll notice it has formed a skin on the top while cooling. Remove the skin and discard. Take about 1 cup of milk out of the pot and using a whisk, mix it with the yogurt culture. Now add that back to the pot of milk and whisk that mixture.

Grab your bath towel and take your Crockpot of inoculated milk to a warm part of the house. With the cover on the Crockpot, wrap the whole baby up in the bath towel and let it sit in that warm spot for about 8 hours. That’s right, 8 hours. You need to plan your day out around yogurt, both the heating and cooling, as well as allowing yourself the full 8 hours for it to create yogurt magic.

After 8 hours you have yogurt. You can put your Crockpot insert into the refrigerator if it’s time for bed, or portion out the yogurt into glass or plastic containers. I lined a colander with cheesecloth, set the colander over a bowl, and took some of the yogurt out, putting it into the cheesecloth to make ‘sour cream’. I covered the colander with plastic wrap and set it in the refrigerator overnight. The next morning I had a very thick yogurt I’m going to use as sour cream –  to top off the pork carnitas!

The next day I also took some more of the yogurt and placed it into the cheesecloth lined colander to thicken it up a bit to the consistency of Greek yogurt. That took about 3 hours in the refrigerator.

So it’s true, I’m a yogurt-making convert and this house is going to be filled with the dairy air for at least the next 12 weeks to come. I only have twelve weeks left in my year – I can hardly believe it.


Week 39 – An Inconvenient Pantry (Part 2: Condiment Whore)

I never realized how “over-the-top” our pantry was with condiments, seasonings, chutneys, salts, vinegars, and sauces until a friend pointed it out a few years ago by taking a picture of our refrigerator door and posting it on Facebook. “You two are condiment whores,” she exclaimed! It took this posting for my blog to realize how right she really was.

Now some of you might be thinking if I’m cooking everything from scratch, why the heck aren’t I making my own condiments too? I had to ask some of the same questions of myself when I started this project, like is a condiment a “food” or is it a “seasoning?” Am I going to make my own mayonnaise and barbeque sauce and ketchup? Can you even make your own mustard? What about vinegars? Do I have to grow my own herbs? Wait a minute – this isn’t Amish in the City – and I’m not going to take this to an extreme (any more extreme than it already is).

So I decided condiments are okay to use and I won’t consider them convenience foods. That doesn’t mean I won’t try to make barbeque sauce or mustard, but I won’t limit myself from using them. Out of curiosity I did Google “how to make your own vinegar” and while the Vinegar Man scares me a little (go ahead and look), I must admit it doesn’t seem worth the time and what I’m guessing is a not too pleasant odor.

Anyways, it’s time to tour my condiment pantry, the savory, the spicy and the unconventional. This is just a mere sampling, my friends.

Item Why I Keep It Stocked
Tamari (or soy sauce) Not just for Asian inspired dishes. I use this to season fajitas, greens, soups, and in marinades for meats
White Balsamic Vinegar A lighter alternative to regular balsamic, which can sometimes overpower a dish. Use in salad dressing or to brighten up a sauce.
Bavarian Beer Vinegar Honestly, I haven’t tried this one yet but wow is it interesting. I think it would go well in umm, German inspired dishes like sauerbraten.
Chipotle Tabasco Sauce This is the hero in my pantry. Adds a little spice as well as smokiness. Love to use in chili as a seasoning, as well as tacos, fajitas, BBQ sauce, and my version of Spanish rice.
Miso Paste Not only an ingredient in miso soup, I use as a base for a sauce (like beef stroganoff) or I add to stock for gravy, in place of bouillon cubes.
Anchovy Paste The secret ingredient in my balsamic dressing, but I also like to add just a bit to greens – sautéed with shallots and a splash of white wine.
Smoked Spanish Paprika I never knew there was another paprika besides sweet or hot. The flavor is amazing and it’s one of the main ingredients in my pork carnita seasoning.
Ancho Chili Powder Another great discovery I made this year  to kick up my homemade chili and pork carnitas. Also good in tacos or just adding just a touch to guacamole and homemade salsa.
Cardamom Pods and Powder India’s answer to one of the best seasonings for savory or sweet goods. I use the powder along with cinnamon in my granola. The pods can be toasted with other Indian spices, then ground to make your own curry or masala.


I found this recipe online for making mustard. I have more than 10 different kinds of mustard in my refrigerator right now, and got three tubes of my favorite German mustard for Christmas. So I don’t really have any need to make mustard. However this sounds both easy and delicious so I’m going to try it this week.

Homemade Mustard

3 tablespoons yellow mustard seeds

2 ½ tablespoons brown mustard seeds

1/3 cup GOOD white wine (the kind you would drink, not just cook with)

1/3 cup white wine vinegar

1 shallot, minced (you need about 2 tablespoons)

¾ teaspoon salt

¼ teaspoon white pepper

A pinch of allspice

Using a glass or ceramic bowl (not stainless) combine all the ingredients and refrigerate overnight, covered. The next day, transfer your mixture to a blender and blend until you reach the thickness you like in mustard. Store your mustard in a glass container, the recipe I read said it should last about 2 weeks.


Back to my New Year’s commitment to try something new each week, this week I made croutons with some of my stale bread. I really have been missing croutons since I eat salads pretty often and used to love adding them when I purchased from the salad bar at my store. The recipe I found was a little over the top oily, so I scaled it down a bit and added a few of my own spices. Problem with homemade croutons is you really need to eat them right away or they will turn soft when stored in a container. At least that was my problem with them. If you know of a solution, let me know. I had to “crisp” them up in the toaster oven each time I wanted to use them, a rather inconvenient step I might add.

Croutons

4 cups bread, cubed

2 tablespoons butter

2 tablespoons olive oil

½ teaspoon salt

½ teaspoon oregano

½ teaspoon dried thyme

Melt the butter and olive oil together in a large pan. Add your bread cubes and stir to coat well. Keep stirring the cubes of bread until they are nice and golden brown. Take one out of the pan and let cool a bit. Is it crunchy? If it is, time to add all of your seasonings and mix well. Set croutons on paper towels to cool if they seem a little greasy.


Week 38 – An Inconvenient Pantry (Part 1)

Being the kind of person who likes to drive around the neighborhood at night because I’m curious to see the inside of other people’s houses, I stumbled upon a website a little while ago that takes a peek into other people’s pantries. The Perfect Pantry author Lydia Walshin has been food blogging since 2006, and her website is a great place to dig in to find a great recipe or to peek into someone else’s pantry. Some of them are awesome while others are honestly quite horrifying.


Lydia let her readers peek into my pantry this week which inspired me to write about how my “well-stocked for inconvenience” pantry has been helping me through this one-year challenge. Before we peek further, I also want to give a shout out to Outpost’s Pantry Raid girls, Diana and Carrie, who not only are darling and funny but were also an inspiration to me to take on this challenge. Don’t miss their blog on Outpost’s website – it’s not only fun but the recipes are truly delicious and inspired.

Now on to my pantry. Part One of my inconvenient pantry focuses on the dry good essentials – items I just can’t do without, and in a pinch, will help me pull together a either a baked good meal. These ingredients are the backbones of the things I used to buy ready-made, such as bread, crackers, chips, breadcrumbs, tortillas, pita bread, polenta, rice pilaf, granola, pizza crust, granola bars, and all beans that are canned.

I like to store them in vintage jars, my favorites being vintage herring jars, which are appealing for their size as well as the lid graphics. Of course I like to collect vintage anything and finally found something with a purpose. I’m actually about three steps shy of hoarder, so watch for me soon on your favorite Discovery channel.

Here is a chart of the pantry essentials and why you want to keep them in stock:

Item Why I keep it stocked
Rolled Oats Granola, granola bars, and the occasional cookie
Quick Cooking Oats Instant oatmeal in the microwave, ingredient in multi-grain bread, ingredient in meatloaf if I don’t have breadcrumbs made. Convenience food? Don’t judge.
Corn Grits Polenta, ingredient in multi-grain bread, bottom coating for a variety of breads and pizza crust
Masa Harina Corn tortillas, corn chips, also thickening agent in some Mexican stews
White and Whole Wheat Flour Wow, need I explain? Breads, pizza crust, popovers, muffins, thickening agent (roux), cakes, cookies, crackers (it’s no wonder I’ve gained 5 pounds)
Instant Yeast I get a good rise out of this!
Semolina Flour Pasta!
Flax Seeds and Flax Meal Breads, crackers, granola bars, banana bread
Sesame Seeds Bread topping, crackers, Asian cooking
Quinoa, Couscous, Rice Salads and side dishes galore!
Beans & Lentils I admit I hate cooking beans and don’t do it all that often. Red lentils have come in handy for making dal since it’s quick to cook.
Nuts & Seeds Are you old enough to remember Euell Gibbons? Ever eat a pine tree? Okay – Granola, granola bars, breads it is.
And Finally, Chocolate Chips Seriously! Granola bars, pancakes, banana bread, and a nice little snack every now and then.

My New Year’s resolution (or acclaim as I’d put it) was to make the best of my final fourteen weeks and try to make something new each week. This past week I tried to make mozzarella cheese and tortilla chips. The operative word here really is “tried.”

The cheese came out “okay” mostly because I didn’t do enough research ahead of time, like watch cheese-making videos on the web. Little did I realize the curds have to be as hot as the sun before you handle them and then stretch them into what should resemble cheese. So I overworked them a bit at first and lost a bit of the milk fat. We did enjoy them on what I was hoping would be the perfect pizza on New Year’s eve – homemade crust, sauce made from scratch from the tomatoes I canned, and homemade cheese. It just wasn’t meant to be perfect I guess, as I overworked the crust as well as the cheese, but I was pretty proud of taking inconvenient to the extreme.

The tortilla chips, well I’m going to save that story for another post when I get them right.

Watch for Part Two of my pantry posts next week, which will be appropriately titled “condiment whore.”

Week 35 – Do Try This At Home

My Mom, great Grandma Wagner (and me)

Many of us have our family holiday traditions that center around baking sweets. I can still remember my great grandmother, who really loved her sweets, introducing me to all of the “old world” traditional goodies that appeared in her kitchen year-round, not only at Christmas. Delectable’s such as German kuchen (or coffee cake as I knew it), strudel, and one of my all time favorites, stollen, were among the bakery discovered by my siblings and I in the shiny metal “bread box” at grandma’s house. I can still feel the weight of the door as it opened up to reveal the sweet fragrance of sugar and spices, as well as I can still hear my grandma calling out, “I heard noise that – what are you kids up to?”

I’ve been working on perfecting my version of great grandma’s Christmas Stollen for the past several years, as my memory insists to me that hers was truly homemade. I’m sure in reality it was purchased from the local bakery or probably day old at the grocery store – but I’ll live with my romantic version of my great grandma toiling away in the kitchen – holiday music on the record player – and me kneeling on the kitchen chair reaching to help her knead the dough or add the sugar icing.

In today’s modern world of baking stollen, the process isn’t at all difficult, although most of the recipes I’ve found don’t include making a sponge or inebriating the fruit in advance. This one doesn’t even require kneading, and if you have a KitchenAid mixer, the mixer does the grunt work. This simply is one of the best stollen recipes I’ve found, and if I do say so, it tastes just like grandma made it.

Merry Christmas everyone!

Ever So Authentic Grandma’s German Stollen

The Fruit Mix

1 ½ to 1 ¾ cups dried fruit

(I like to use dried blueberries, cherries, cranberries and currants. To me, the smaller fruit is better and incorporates well into the bread.)

3-4 tablespoons rum

Mix the fruit and rum in a bowl or jar and cover. Stir the bowl of fruit (or shake the jar of fruit) every 30 minutes or so. I usually wait to use the fruit after it’s been soaking for 2-3 hours. You’ll know it’s ready when the dried fruit is no longer dry and the kitchen smells like you’ve been hitting the bottle all morning.

The Sponge

2 ½ teaspoons dry active yeast

¼ teaspoon granulated sugar

¾ cup warm milk (110-115°)

1 cup all purpose flour

Combine the yeast, sugar and milk in the bowl of your mixer and let stand for about five minutes until the mixture is foamy. If it doesn’t foam, you really need to start over. (Hint: use a kitchen thermometer to make sure your milk isn’t too hot or isn’t too cold. Kinda like Goldilocks.) Add the flour and mix until well incorporated. Cover the bowl tightly with plastic wrap and let it sit for 45 minutes. The sponge should be very bubbly when it’s ready to use.

The Bread

2 cups all purpose flour

½ cup whole wheat pastry flour

1 teaspoon salt

1 stick (8 ounces) unsalted butter, melted and cooled

2 tablespoons salted butter, melted (to use later when you shape the loaves)

2 large eggs, lightly beaten

½ cup granulated sugar

½ cup finely chopped pecans

Add the four, salt, sugar, stick of melted butter, and eggs to the sponge and beat at medium speed with the paddle attachment until incorporated. Switch to the dough hook and add the dried fruit and chopped pecans. Mix at medium speed for about five minutes, until the dough begins pulling away from the sides of the bowl and all of the fruit and nuts are incorporated well. The dough is going to be a little sticky – that’s the way it should feel.

Put the dough into a lightly oiled bowl and turn it to coat. Cover with plastic wrap and a towel, and put it in a warm, draft-free place to rise for about 90 minutes. It will double in size, so make sure you use a large enough bowl.

After 90 minutes, punch down the dough and turn it onto a lightly floured surface. Knead briefly. Divide the dough into two equal balls and roll each ball into an oval, about 1 inch thick. Brush the top of the dough with the melted butter and fold the oval in half, horizontally. Pinch the two sides together, and with the pinched seam at the bottom, shape the loaf to keep the oval shape.

Arrange the two loaves on a well-buttered baking sheet (or Silpat) and cover loosly with plastic wrap and a towel for a second rising (another 90 minutes). Again, make sure you put the pan in a warm but draft-free place. The loaves will again double in size.


The Glaze

2 tablespoons salted butter, melted

2 tablespoons powdered sugar

Heat the oven to 350° with the rack in the middle of the oven. Brush the stolen with the butter and bake until the loaf is a deep golden brown and the bottom sounds hollow when tapped, about 40-50 minutes. Transfer both breads to a cooling rack and when they are completely cool – dust them with the powdered sugar.

* Recipe adapted from the Gourmet Cookbook by Ruth Reichl.


Week 32 – Ever So Thankful!

I just love me a holiday totally focused on food traditions, don’t you? While we might all succumb to the tradition of hot dogs or brats on Independence Day, or honey-baked ham on Easter, the “sides” at Thanksgiving really vary a lot from household to household. Sure there is the family tradition of making the family favorites grandma used to make when you were a kid (although no one in my family has been able to duplicate the potato dumplings my Grandpa used to refer to as “cannon balls”), but I’m here to tell you that having a non-traditional side like I had this year, caused me to think fondly about all the foods I’m truly thankful for, convenient or not.

When we arrived at my parent’s home for Thanksgiving (turkey, gravy, and butternut squash gratin in tow), the first thing that happens after the hugs and hellos is making room in the oven for everything. My Mom was acting kind of funny right away about needing the oven for her dish before we could crowd it with any of ours. What do you have there Mom, I asked? Now all I asked for from my Mom this year was to make the mashed potatoes, since she was hosting the gathering and that meant she had to clean the house and set the table (and I didn’t have to). Mom got a big grin on her face and said, “it’s a surprise” as she took her ever so secretly aluminum-foiled dish, allowed my Dad to have a peek at it, and placed it in the oven at 400°. After about an hour when all of the side dishes were unveiled and the aluminum foil was removed, the great secret was put before us. We were having Mom’s homemade macaroni and cheese. Now never before in the 50+ years of my family’s Thanksgiving traditions have we EVER had macaroni and cheese, although for all of us it was our childhood favorite dish. My Mom just smiled and told us she hadn’t made the dish at all since we all left home, and just felt like making it for us today. My Mom’s surprise made this Thanksgiving more special for me than others in recent memory, mostly because I’m so thankful I still have her there to surprise me.

Living my life inconveniently the past 32 weeks I’ve developed a great appreciation for a number of foods I may have under other circumstances, taken for granted. To start with, I’m really thankful to have a food co-op in my community where I have a super great variety of bulk ingredients to fill up my pantry. After all, the premise of this year is from scratch cooking and baking – and that would be made more difficult without my Outpost Natural Foods Co-op. Most of the ingredients I use regularly, like flour, oats, yeast, nuts, and beans are also all organic. Buying in bulk is not only a cost-savings measure when cooking from scratch, but I also use less packaging and can re-use my plastic bags from week to week.

I’m also really thankful for farm-fresh eggs. When I refer to farm-fresh, I mean that I’m thankful I’ve actually met the farmer (Lynn Lein from Yuppie Hill Farm), and that my eggs were NOT part of a national recall this past fall. I use a lot more eggs now than before I started my food project when they were primarily a breakfast option for me. Now eggs are an important ingredient in things like baked goods and fresh-made pasta, as well as in a salad or on a sandwich for my lunches.


I’m thankful I found a bread recipe I really love and have gotten quite proficient at making once a week. While I enjoy making bread from scratch, and enjoy trying out different methods of baking, this multi-grain bread has become my standby recipe that is a much better substitute than the convenient variety I used to buy, and much more economical as well. I can also experiment by adding a new combination of grains each time I make it, so far without disappointment. This recipe can also be easily made into hamburger or hot dog buns just a few at a time which means I’m not wasting them like I used to when buying a package of eight from the store.

I could go on and on about the many other foods I’m thankful for (Growing Power greens, Indian spices, homegrown tomatoes, Wisconsin maple syrup, Diana’s pickles or Lisa’s pasta sauce) to name a few. But what this year has taught me so far more than anything else is that food and our food sources in particular, should be respected and not taken for granted. Here in the good old US of A we continue to have some of the lowest food costs per capita of any nation, and we continue to rely more and more on processed foods that I really can’t call “food” in good conscious. When you cook all of your meals from scratch you develop an appreciation for the time and resources it takes to get something as simple as a loaf of bread or jar of pasta sauce on your table. I waste less food now than I did before, and save even the smallest amount of a gravy or sauce for another use in my freezer.

And it goes without saying, I’m really thankful I’ve had my readers to encourage me and keep me motivated to go this far this year. I could have easily given up on this whole thing a number of times now, but your encouragement keeps me moving forward, with only twenty weeks left. HOLY CRAP – only twenty weeks? I still have to try making cheese and yogurt and barbeque sauce and mayonnaise and…. I better get crackin!

Week 30 – The Price of Convenience

For a while now I’ve been meaning to do a comparison of a number of the foods I now make from scratch, with their ready-to-eat counterparts. Because collecting the information and weighing out the ingredients takes some work, and I haven’t made the time for it with all this cooking, baking and writing I’m doing. However when I realized this would give me the opportunity to geek out and dig into data, it became easy to prioritize. Besides that, I’ve been pretty curious about it myself.

For me bakery products seemed like the easiest place to start with such a comparison, since prior to last April I would bake the occasional bread more as a hobby than a necessity. To get a closer apple-to-apple comparison I’m comparing the cost of convenience (or is it the inconvenience) by weight or volume. All ingredient costs are at the regular retail price and all comparisons to convenience counterparts are made with products available at Outpost Natural Foods.

First item up for comparison is multigrain bread. This past weekend I made one of the recipes from the Peter Reinhardt book I got for my birthday in September – one that requires a two-day preparation process. First step is making the soak and the biga and letting them sit for 24 hours before assembling, proofing, retarding and baking. My bread is pretty good looking, and it has a nice crumb and sweet flavor from the flax meal. I decided to compare with one of the breads Outpost bakes off– a multigrain with somewhat similar ingredients. My bread is a whopper, a whole 32 ounces, while the Outpost multigrain is around 24 ounces. Ounce-for-ounce, my bread was a winner – costing me only 9¢ per ounce to bake from scratch – while the convenience bread costs 24¢ per ounce.

Feeling rather confident about the impact my inconvenient life is having on my wallet, item number two up for comparison is granola. Before I started making everything from scratch, I was hooked on the maple walnut granola my co-op sells in bulk. It’s made locally and really has a terrific maple flavor. When I started out experimenting with my own version of granola I decided to use real maple syrup in my recipe – while the co-op bought version uses honey and natural maple flavoring. My granola doesn’t have the same flavor, and after four other versions my Granola #5 ended up tasting the best with pecans instead of walnuts, and cinnamon and cardamom instead of maple flavoring. My granola also has almost all organic ingredients, while the original doesn’t. The comparison here includes walnuts (to get closer to the original) and I compared the batches pound-to-pound. Even with using maple syrup my granola was a winner at $6.49 per pound, while the original weighed in at $6.99 per pound. However when I substitute organic pecans for walnuts, my granola cost jumps to $7.26 per pound. So, I’m not saving money but I swear I’m not going back to the store-bought version when granola is so easy to bake.

I chose those two items for comparison because I make them almost every week. By the end of this year-long experiment I expect to have made approximately 49 loaves of bread and 40 batches of granola. If I calculate the savings on that over a one-year period of time, my bread baking will have saved me $147.49, while making granola with pecans vs. walnuts – I’ll have spent approximately $10.80 more. You know, I’m feeling like a winner!

I’ve also calculated the savings on salad dressing and baking my own turkey breast for lunchmeat – both of which were real eye-openers, but that will have to wait for a future post. Right now I have some more food prep to do.